Wednesday, May 29, 2013

Creating a Tab Bar Application from Scratch

Using a template is well and good, but it doesn’t teach you how to actually build a tabbed
application (unless you are able to use the template). So in this task, you duplicate the Tab
Bar Application template’s steps, but start with a Window-based Application template and
manually add the tab bar items to your project. It is no more difficult than using the template—
just slightly more tedious.

1. Create a new Window-based Application and name it TabBarExTwo.

2. Open TabBarExTwoAppDelegate.h and change it so that it adopts the UITabBarController  Delegate protocol . Add a UITabBarController property as an IBOutlet. The
UITabBarControllerDelegate.h should appear like Listing . Don’t forget to synthesize
the controller in UITabBarControllerDelegate.m. Save and build.

#import <UIKit/UIKit.h>
@interface TabBarExTwoAppDelegate : NSObject <UIApplicationDelegate,
UITabBarControllerDelegate> {
 UIWindow *window;
 UITabBarController *tabBarController;
}
@property (nonatomic, retain) IBOutlet UIWindow *window;
@property (nonatomic, retain) IBOutlet UITabBarController
*tabBarController;
@end
 

3. Create a new UIViewController class and name it FirstViewController. Be certain
it also creates an associated xib. Xcode should generate the FirstViewController.h,
FirstViewController.m, and FirstViewController.xib files.

4. Create another UIViewController and associated xib named SecondViewController.

5. Open FirstViewController.xib and change the view’s color. Open SecondViewController
.xib and change the view’s color.

6. Save all of your changes.

7. Open MainWindow.xib and drag a new UITabBarController from the Object Library to the
Editing pane. Interface Builder should show a tab bar controller with two tabs.

8. Select the TabBarExTwoAppDelegate’s Connections Inspector and connect its
tabBarController outlet to the tab bar controller in the document window.

9. Click once on the first tab of the TabBarController in the Editing pane, and change
its class to FirstViewController in the Identity Inspector. Change its Nib Name to
FirstViewController.

10. Change View Controller (Item 2) to the SecondViewController, using the same steps as
the preceding step. Do not forget to set the NIB Name to SecondViewController in the
Second View Controller Attributes Inspector.

11. Change the first tab’s identifier to Recents and the second tab’s identifier to Downloads
(Figure 8-7).

12. Save your changes.

13. Open TabBarExTwoAppDelegate.m. Add the tab bar controller to the
applicationDidFinishLaunching method (Listing 8-3).


Listing 8-3   TabBarExTwoAppDelegate.m modified to use a UITabBarController

#import "TabBarExTwoAppDelegate.h"
@implementation TabBarExTwoAppDelegate
@synthesize window;
@synthesize tabBarController;
-(void)applicationDidFinishLaunching:(UIApplication *)application {
    [window addSubview:tabBarController.view];
    [window makeKeyAndVisible];
}
-(void)dealloc {
    [window release];
    [tabBarController release];
    [super dealloc];
}
@end
14. Click Run, and a two-tab application runs in the iPhone Simulator (Figure 8-8).


Using a Window-Based Application Template

The View-based Application template hides many development details. If new to iOS
programming
, chances are you will not find that the View-based Application template helps
clarify a UIView, a UIViewController, and their relationship. To help make their relationship
clearer, you should understand what the View-based Application template accomplishes  automatically.

Unlike a View-based Application template, a Window-based Application template requires
understanding UIViews and UIViewControllers. When using the Window-based Application
template, you must manually create a view and a view controller and wire them together. In
this project, you create a single view application starting with a Window-based Application
template. Creating a Window-based Application should solidify your understanding of the
steps used by Xcode when creating a View-based application.

1. Create a new Window-based Application and name it SimpleWindow.

2. CTRL-click the Resources folder and select New File. Select User Interface under iOS and
select View to create a new xib. Name the xib FirstViewController.xib.

3. Select File | New | New File. Add a UIViewController named FirstViewController. Xcode
should create FirstViewController.h and FirstViewController.m. Be certain the check box
to create a xib is not checked.

4. Open SimpleWindowAppDelegate.h and either import the FirstViewController
or use an @class forward declaration. Add a UIViewController property to
SimpleWindowAppDelegate.h so that it appears the same as Listing 7-5.

Listing 7-5   SimpleWindowAppDelegate.h
 
#import <UIKit/UIKit.h>
@class FirstViewController;
@interface SimpleWindowAppDelegate : NSObject <UIApplicationDelegate> {
 UIWindow *window;
 FirstViewController *rootViewController;
}
@property (nonatomic, retain) IBOutlet FirstViewController
*rootViewController;
@property (nonatomic, retain) IBOutlet UIWindow *window;
@end


5. Modify SimpleWindowAppDelegate.m so that it appears like Listing 7-6. Notice you
must synthesize rootViewController and add its view to the window as a subview in the
delegate’s applicationDidFinishLaunching: method.

Listing 7-6   SimpleWindowAppDelegate.m

#import "SimpleWindowAppDelegate.h"
#import "FirstViewController.h"
@implementation SimpleWindowAppDelegate
@synthesize window;
@synthesize rootViewController;
-(void)applicationDidFinishLaunching:(UIApplication *)application {
  [window addSubview:rootViewController.view];
  [window makeKeyAndVisible];
}
-(void)dealloc {
  [window release];
  [rootViewController release];
  [super dealloc];
}
@end


6. Select FirstViewController.xib to display it in Interface Builder. Select the File’s Owner
and then select View | Utilities | Identity from the main menu. Notice that the class of the
File’s Owner isn’t set.

7. Change its class to FirstViewController from the pull-down in the Object Identity Inspector
pane.

8. Select the view, select Object Attributes in the Inspector pane, and change the view’s color.

9. Select the File’s Owner and click the Connections button in the Inspector pane, and then
connect the view outlet to the view you added to the document window.

10. Save FirstViewController.xib and select MainWindow.xib to open it in Interface Builder.

11. Notice that there is no UIViewController or view set in the document window.

12. Scroll down in the list of objects and drag a view controller from the library to the editing
pane. With the View Controller selected, go to the Object Identity Inspector pane and set its
class to FirstViewController (Figure 7-1).


13. In the Object Attributes Inspector pane, change its NIB Name to FirstViewController.
 
14. Select Simple Window App Delegate (one of the icons to the left of the editing pane).
Select the Connections Inspector pane; notice the rootViewController outlet. Connect this
to the view controller just added (Figure 7-2).
 
15. Save your changes.
 
16. Click Run to build and run your application. The view in FirstViewController.xib will be
loaded into the window and displayed.
 
In Step 14, you connected the FirstViewController to the application’s delegate.
This was an important step; it allowed the nib to set the delegate’s root view controller
for you. The root view controller is the UIViewController that is first loaded by an
application delegate. Remember, the application knew to load MainWindow.xib because
it was in the application’s Info.plist. The application loaded MainWindow.xib, saw the
FirstViewController object that was added to the document window, and saw that the 


delegate’s root view controller was set to FirstViewController. The application also knew
the controller came from FirstViewController.xib. Because of the object, variable, and nib
settings, the application knew to allocate and initialize a FirstViewController instance from
FirstViewController.xib when loading MainWindow.xib. Because these relationships were
established in Interface Builder, no manual code was necessary. This is how the View-based
Application template builds a simple application, which you just duplicated manually using
the Window-based application template.
 
NOTE

In this example, you manually created a xib and linked it to its associated view
controller. Step 3 specifically instructed you not to check the check box that also
created a xib; had you checked the check box, Xcode would have created a xib
and automatically made most of these connections for you.

Using a View-Based Application Template

1. Create a new View-based Application using the template. Name the project SimpleView.

2. Expand the Classes group and notice XCode created the SimpleViewViewController
class for you. Expand Resources and notice the template generated a separate nib,
SimpleViewViewController.xib, for the SimpleViewViewController.

3. Open SimpleViewViewController.h and add a label and method for changing the label’s
value. Make the label an IBOutlet and the method an IBAction (Listing 7-1).

Listing 7-1   SimpleViewViewController.h

#import <UIKit/UIKit.h>
@interface SimpleViewViewController : UIViewController {
UILabel * theLabel;
}
@property (nonatomic, retain) IBOutlet UILabel *theLabel;
-(IBAction) changeLabelValue: (id) sender;
@end


4. Open SimpleViewViewController.m and add the IBOutlet and IBAction definitions
(Listing 7-2).

Listing 7-2   SimpleViewViewController.m

#import "SimpleViewViewController.h"
@implementation SimpleViewViewController
@synthesize theLabel;
-(IBAction) changeLabelValue : (id) sender {
  [theLabel setText:@"Hello World."];
  UIButton *theBut = sender;
  NSLog(theBut.currentTitle);
  theBut.enabled = NO;
  [theBut setTitle:@"Pressed Already" forState:
UIControlStateDisabled];
}
-(void)dealloc {
  [theLabel release];
  [super dealloc];
}
@end


5. Select SimpleViewViewController.xib to display it in Interface Builder and change the
view’s color. Add a UILabel and a UIButton to the UIView.

6. Notice that SimpleViewViewController is the File’s Owner. Connect SimpleViewView Controller’s theLabel outlet to the label.

7. Connect SimpleViewViewController’s changeTheLabel action to the button. Select Touch  Up Inside.

8. Save your changes.

9. Click Build And Go to run the application.

Take a moment to examine what the View-based Application template did for you.  It created the SimpleViewViewController.xib and it also created a UIViewController  subclass, SimpleViewViewController, by creating the SimpleViewViewController.h and  SimpleViewViewController.m files. Moreover, it added the controller to the delegate
(Listing 7-3).

Listing 7-3   SimpleViewAppDelegate.h
 
#import <UIKit/UIKit.h>
@class SimpleViewViewController;
@interface SimpleViewAppDelegate : NSObject <UIApplicationDelegate> {
  UIWindow *window;
  SimpleViewViewController *viewController;
}
@property (nonatomic, retain) IBOutlet UIWindow *window;
@property (nonatomic, retain)    IBOutlet SimpleViewViewController
*viewController;
@end
 

In the delegate, the template created the application’s window and view controller as
outlets (Listings 7-3 and 7-4). In the delegate’s applicationDidFinishLaunchingWithOptions:
method, the template added the view controller’s view to the window and then displayed the
window. Notice that nowhere does the code allocate or initialize its window or view controller.
Instead, Info.plist specifies that MainWindow.xib is the application’s main nib, so it knows to
load MainWindow.xib and the nib handles window and view controller initialization.

Listing 7-4   SimpleViewAppDelegate.m

#import "SimpleViewAppDelegate.h"
#import "SimpleViewViewController.h"
@implementation SimpleViewAppDelegate
@synthesize window;


@synthesize viewController;
- (BOOL)application:(UIApplication *)application
didFinishLaunchingWithOptions:(NSDictionary *)launchOptions {
  [window addSubview:viewController.view];
  [window makeKeyAndVisible];
  return YES;
}
-(void)dealloc {
  [viewController release];
  [window release]; [super dealloc];
}
@end


In the MainWindow nib, the template set the nib’s file’s owner to UIApplication. The
template set SimpleViewAppDelegate as the application’s delegate and set the delegate’s
window to the window in MainWindow.xib.

The template also added a view controller to MainWindow.xib and set it as the delegate’s
root view controller. Every delegate must have a root view controller. The root view controller in
MainWindow.xib comes from the SimpleViewViewController.xib, also created by the template.

The template created the UIView in its own xib, SimpleViewViewController.xib. It set
SimpleViewViewController.xib’s file’s owner to SimpleViewViewController. It also set the
controller’s view to the view in the xib.

The UIView Class in Xcode

The UIView’s responsibilities are drawing to the screen and handling events associated with
a user’s interaction with an application. A UIView has an associated UIViewController. The UIViewController manages the view. The view controller loads and unloads its associated  views, manages views, and handles application life cycle events for its views.

Every graphical iOS control you use in Interface Builder is a UIView subclass. Table 7-1 lists  the UIView subclasses. Notice that UIScrollView and UIControl both have further subclasses
listed in the table’s second column.

UIViews function as containers, controls, displays, alerts, action sheets, and navigation  controls, and also as the application’s window. In future chapters, we’ll cover most of  these UIView types. This chapter limits itself to a simple display view and associated view  controller.

The UIViewController Class

The UIViewController manages UIViews. It is responsible for creating, displaying, hiding,
and destroying a view. The UIViewControl is also responsible for responding to a view’s life
cycle events, handling orientation, and serving as a bridge between your application’s view
and model. The view controller is your application’s controller in the model-view-controller
design pattern.

View-Based Application Template

The easiest route to creating a single view application is using Xcode’s View-based Application
template. This template creates a single view and a view controller for managing the view. While
the View-based application is not as useful as Xcode’s other project templates, it is helpful here,
as it generates the simplest iOS graphical application and provides a straightforward UIView and
UIViewController example. In the next task, you will generate an application using this template.
But, before continuing, first we will review IBOutlets and IBActions.

IBOutlet and IBAction

You have already used IBOutlets and IBActions in previous chapters. Without really knowing
what they are, you probably already have a good idea of what they accomplish; outlets and
actions are how you connect things in a nib with things outside a nib. An outlet connects an
instance variable outside a nib to an object in a nib.

IBOutlet is a preprocessor directive, evaluates to void, and is ignored by the compiler,
but all you really need to know is that IBOutlet is how Interface Builder knows the
variable was created for its use. When you change the class of an object, Interface Builder
scans the class for IBOutlets and knows those variables are intended as outlets. You can
then easily connect your graphical component to the variable, as Interface Builder adds
the outlets to the inspector automatically for you to select. Note, though, Interface Builder
doesn’t connect the outlets to anything; it just adds them. You are responsible for adding
any connections.

Actions are messages sent from objects in the nib to methods outside the nib. You define
an action in your code using the IBAction keyword. Like IBOutlet, it’s a preprocessor directive
and evaluates to void. You define an action in your code using the IBAction keyword. Also,
like IBOutlet, when you assign a class to a control in Interface Builder, it scans the class for
IBActions and adds them to the inspector for you to select. You can then connect user interface
events to a specific method in your code. Note that a method designated as an action must not
return a value, as the preprocessor replaces IBAction with void, and so all the compiler sees is
void. An action also takes a single parameter, sender. The sender is the id of the control calling
the action. So if a UIButton instance called an IBAction named changeLabelValue, the sender
would be the pointer to the UIButton.

-(IBAction) changeLabelValue: (id) sender;

IBOutlet and IBAction don’t require much explanation, as you use these two directives so
frequently they become second nature. Any instance variable external to Interface Builder that
must communicate with a control in Interface Builder must be an IBOutlet. Any method that
must be called from a control in Interface Builder must be an IBAction.


Adding a UIView and UIViewController to a UIApplicationDelegate

 In this project, you start with the simplest iOS template, a Window-based application. You’ll
create the application from scratch by first creating a xib and a corresponding view controller.
You’ll then modify the application’s delegate so that it loads the view.

1. Create a new Window-based Application in Xcode by selecting File | New | New Project and then selecting Application under iOS in the left column and Window Based Application. Select iPhone in the Device Family pull-down. Name the project AddViewProject.

2. In the navigation pane, expand the Classes folder. This folder contains the AddViewProject
AppDelegate.h and AddViewProjectAppDelegate.m files. These two files implement the  project’s custom class that adopts the UIApplicationDelegate protocol.

 
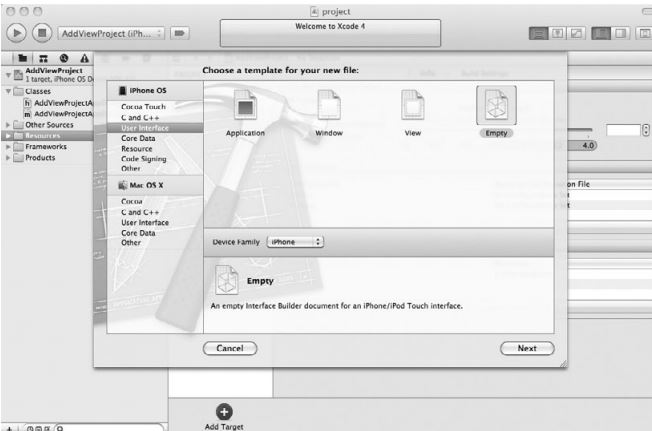
3. Highlight the Resources folder. CTRL-click and select New File from the pop-up menu.
Select User Interfaces from the New File dialog, and select Empty XIB (Figure 6-1). You
may also have to select Resources as the group in the pull-down when naming the file.

4. Name the xib FirstViewController and click Finish.

5. Highlight the Classes folder. Select File | New File from the menu.

6. Select the UIViewController subclass from the Cocoa Touch Classes and click Next  

You could have created the view controller first and then checked the “With XIB for user
interface” check box; Xcode would then have generated the xib for you.

7. Name the file FirstViewController.m. Click Finish.

8. Click FirstViewController.xib to open it in Interface Builder. Select View | Utilities | Object  Library from the main menu to display the object library in the lower-right Libraries pane.

9. Scroll down to the View object, and drag and drop it onto the FirstViewController.xib  Document window.

10. Select File’s Owner icon (the transparent cube to the left of the drawing area). Select View
| Utilities | Identity from the main menu to switch the Inspector pane to display object
identity. Now select FirstViewController as the class in the pull-down menu.

 11. Select the File Owner icon again. Select View | Utilities | Connections from the main
menu (or just click the connections button at the top of the Utilities Area). Drag from
the circle next to View to the view in the drawing area to set the newly created view as
FirstViewController’s view outlet .

12. Select the view, select View | Utilities | Object Attributes from the main menu and then
click in the background color box to change its color.

13. Save FirstViewController.xib.

14. Open AddViewProjectAppDelegate.h, import FirstViewController.h, and create a property
referencing the FirstViewController class .


Tuesday, May 28, 2013

Multiple-Argument Messages Objective-C

As with Objective-C’s other language constructs, multiple arguments will probably appear
strange at first; however, once you become accustomed to them, you will find the syntax easier
than Java, C++, and other dot-notation languages. Why are we so confident that you will love
Objective-C’s syntax for multiple arguments? In a word, readability. How many times have
you seen code like this in a Java program?

objMyClass.startPlay("Adventures of Tom Thumb", 44,
    new CherryPie( ), "Jack Sprat", 77);


What exactly do the arguments mean? What are you sending to the startPlay method in  objMyClass? Now consider the same method using Objective-C.

 [objMyClass startPlay: @"Adventures of Tom Thumb" audienceMembers:44
     pie: [[CherryPie alloc] init] supportingActor:@"Jack Sprat"
    extrasNeeded:77];


You know exactly what the arguments sent to the method mean when using Objective-C. You
are starting a play entitled “Adventures of Tom Thumb” that has 44 members in the audience,
needs a cherry pie, has a supporting actor named Jack Sprat, and requires 77 extras.
The signature of the method called in the previous message has a syntax as follows:

-(void) startPlay: (NSString*) title audienceMembers: (int) value
    pie: (CherryPie*) pievalue supportingActor: (NSString*) actorvalue
    extrasNeeded: (int) extrasvalue;


The first argument is unnamed. The second and any further arguments are distinguished by a
space followed by an argument name and colon, followed by the type in parentheses, followed
by a parameter name to hold the value.

Now, here’s the tricky part: When referring to a multiple-argument method, when
calling the method, you refer to its named arguments. An argument’s named argument is
the name prior to the argument’s data type. When using the argument within the method’s
implementation that the argument is a part of, you refer to the actual parameter name, not the
argument name. So, for instance, in the startPlay method’s implementation, you refer to title,
value, pievalue, actorvalue, and extrasvalue. When calling the method, you refer to startPlay’s
named arguments: audienceMembers, pie, supportingActor, and extrasNeeded.

Saturday, May 25, 2013

Objective-C Classes and Objects

Objective-C classes are the same as classes in any other object-oriented programming
language. A class encapsulates both state (properties) and behavior (methods), and forms an
object-oriented program’s basic building blocks. An object-oriented application functions by
objects sending messages between each other. For instance, in a typical Java command-line
application, you begin the program by calling a static method called main in a class. This
main method instantiates one or more objects, and the application’s remaining functionality
consists of messages between those objects instantiated in the main method, as well as any
objects they might in turn instantiate.

Class Interface and Implementation

Objective-C separates a class into an interface and an implementation. An interface declares
instance variables and methods. It is a standard C header file and doesn’t provide any method
definitions. The implementation contains the method definitions for the class. It is a file with
its own .m extension rather than a .c extension.

Method Declaration and Definition

You declare a class’ methods and instance variables in its interface. You define a class’ methods
and instance variables in its implementation. Declaring a method means you tell the compiler
that a class will have a method, with a certain signature, but you don’t provide the actual code
for the method. For instance, consider the following method declaration.

-(void) sayHello: (NSString*) name;

The declaration tells the compiler to expect a method called sayHello that returns nothing
(void) and takes an NSString as an argument. The declaration says nothing about the method’s
content.

You provide the compiler with a method’s implementation by defining the method. Defining
a method means you provide a method declaration’s actual behavior, or its implementation.
For instance, the sayHello method in Listing 3-3 provides the sayHello method declaration’s
behavior.

Listing 3-3 A simple Objective-C method implementation

-(void) sayHello: (NSString*) name {
  NSMutableString *message = [[NSMutableString alloc]
        initWithString:@"Hello there "];
  [message appendString:name];
  NSLog(message);
  [message release];
}